|
IMAGE EDITING Chuck Williams |
MY SUPER DOUBLE SECRET TECHNIQUEOverview
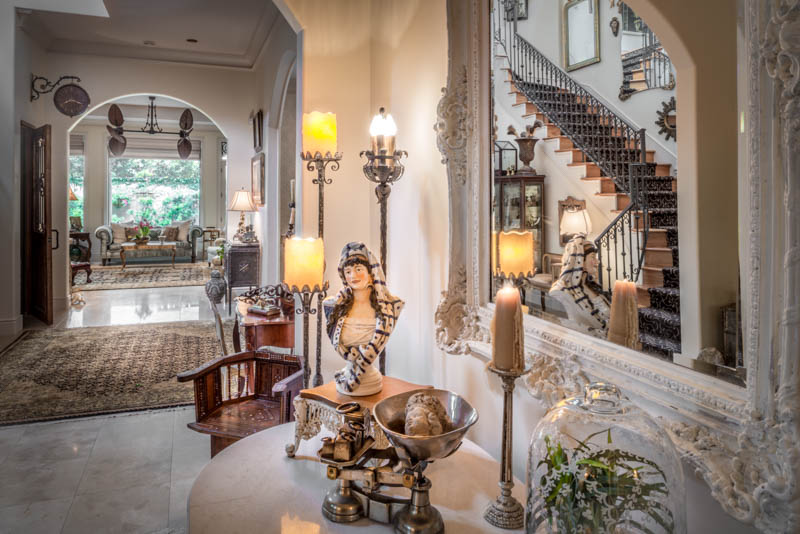
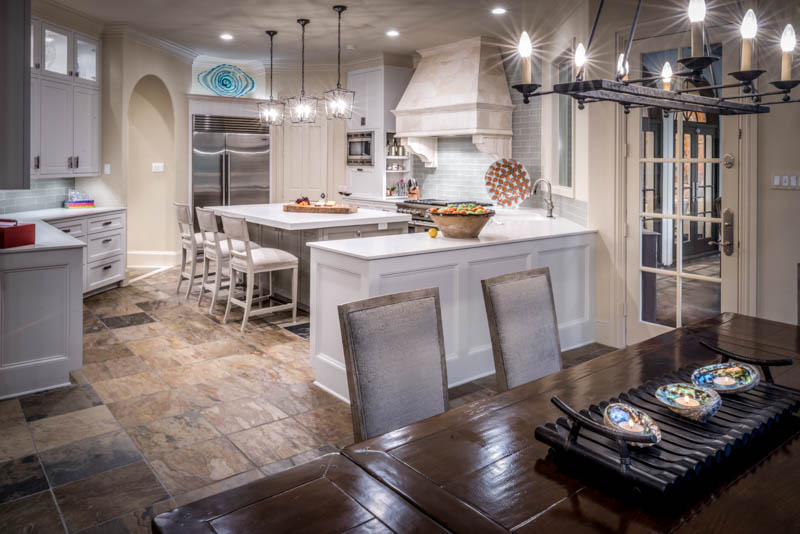
OK. This is my shooting technique, but, of course, it’s not really secret. In fact, I want everybody to use it and send me their files for editing. :-) I use this process to shoot residential room interiors. It's designed to capture a broad range of data that will enable me, in the editing process, to create a realistic and eye pleasing photographic illustration. Lots of Photoshop layers! For this tutorial, it’s assumed that you have at least a basic knowledge of photography, and understand the workings of your camera. If you are a experienced shooter or a pro, this will all be pretty simple. :-) OVERVIEWYou’re going to be using the camera on a tripod and shooting a number of individual files with varying exposures and lighting combinations. The whole idea is to not move the camera between the exposures. That way all of the images line up perfectly as layers in Photoshop. It can be a good idea to use a cable or wireless remote to trip the shutter. CAMERAUsing a good camera is important, but you don’t have to spend a million dollars. I would say that you will probably want to use a camera with interchangeable lenses. A DSLR or a high end mirrorless camera. Make sure that your camera can shoot raw format image files. BTW, if you do decide to spend a million dollars on a camera system, call me. I’ll help. :-) RAW FILES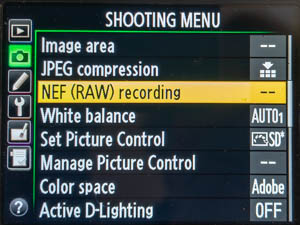
Your camera needs to be able to shoot and export raw format files. This is a file type that delivers the data directly from the sensor, without applying any of the processing that the camera would normally do when saving to a JPEG file. The raw file is specifically for use with editing software such as Photoshop. It offers distinct advantages in several areas. In terms of color, the white balance that you set in the camera is is used to create the preview you see on its LED screen, and will be applied if you save the file as a JPEG. But it is not included in the raw data, so the color balance can be set later. This gives me a lot more latitude in the amount of color adjustments that I can make before the image starts to look weird. Another advantage of raw format files applies to the dynamic range. This means that there is more detail in the highlights and the shadows of the image file. You can’t see it in the preview and this detail is normally discarded when you save the image as a JPEG, or even a TIF file. The view out the window, and quite often the detail in some of the light fixtures will be completely blown out. If the window view or the lighting fixtures are way over exposed, white, the detail is lost and cannot be retrieved. Even though the image looks to be blown out in the highlights, with a raw file there is quite often more detail that can be brought back from the bright end, and the dark end. The amount varies between cameras. In my experience, the raw files from the Nikons, Canons, and Sonys are excellent. If your camera offers compression settings for raw files, do not use anything but lossless. I would not recommend using a camera that does not support raw format files. TRIPODIt doesn’t need to be super heavy or expensive. It does need to be rigid enough so that you can touch the camera a little bit without moving it. A few years ago, I decided to buy a tripod with a ball head. I don’t recommend this. Leveling the camera is very important part of the process. It’s far better to be able to level it side to side with one handle, and then tilt it up and down with the other. LEVEL THE CAMERA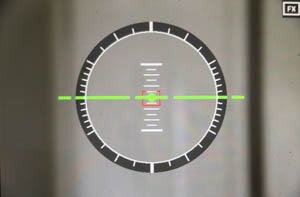
It's not a bad idea to level the tripod first using the bubble that you will find on most of them. Then it's important that you level the camera itself. Even if you plan to tilt it down, it's important that it is level from side to side. When the walls appear to lean outwards at the top, they need to be out an equal amount on each side. Any vertical elements in the center of the image should be vertical. I think a good way to accomplish this is to use the leveling feature that is available in most cameras. SETTINGSAuto focus - definitely turn this OFF. You never want the camera to be refocusing in between your exposures. Focus manually and then don’t touch it for the entire set up. White balance - I always recommend setting it to “auto”, especially if you are not shooting RAW files But as I mentioned earlier, this setting doesn’t really get included in a RAW format file. It does give you a preview that’s easier to look at, but in the end, if you are shooting RAW files, the white balance setting won't really matter... but set it to Auto.
Do not use auto ISO...ever. Virtually all of the other settings in your camera are bypassed when you shoot raw files. The exception, of course, is exposure. Exposure - As mentioned before, you’re going to be shooting lots of different exposures. I recommend that you set your camera to Aperture Preferred Auto. You choose the aperture as needed to get the most depth of field. Generally f16 or f22. Your camera will then choose a shutter speed to give you a properly exposed image according to its meter. You do not want the aperture to change while you are shooting a setup. I always suggest that you use your camera’s Exposure Compensation control to bracket your exposures. If you are set for aperture priority, the changes in exposures will always be made using the shutter speed, which is what we want. FRAME YOUR SHOTSet It And Don't Touch It - Once you start shooting a setup, nothing in the picture can be moved, and of course the camera definitely must not be moved. If someone kicks the tripod in the middle of the process, you have to start over. I tend to rely on the Live View to frame the shot through the LCD display on the camera. Camera Height - Head level is my default. Especially for full room shots. I have occasionally raised the camera slightly to bring a fan or chandelier down into the shot. And more often, I have lowered the camera when I was shooting small area vignettes. There are plenty of times where the shot itself will dictate a variation. DO NOT SHOOT THE CEILING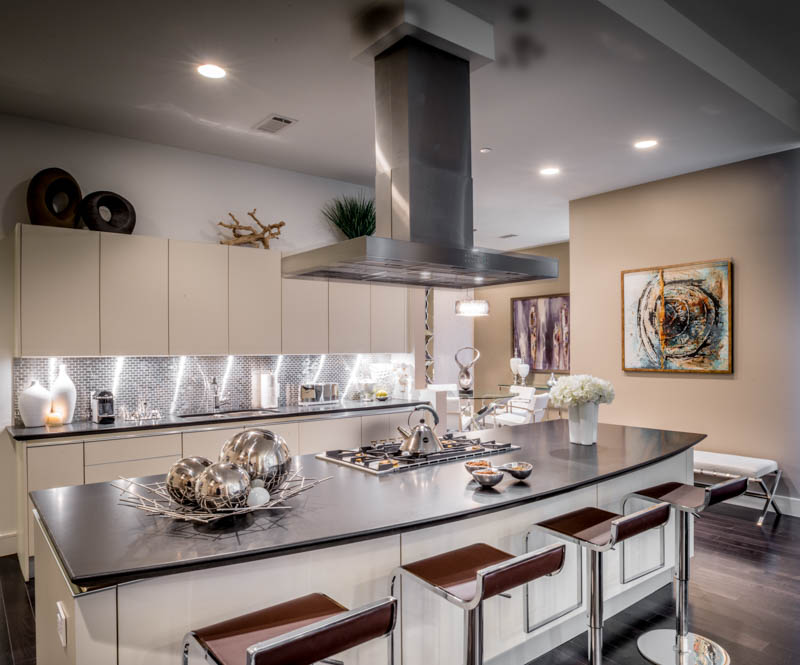 Don’t be afraid to tilt the camera down. Yes, that’s when the walls will start to lean out at the top, but I can fix that later. If you don’t point the camera down, you'll get a photo in which the top third is ceiling, and the bottom part of the image that is usually much more important gets chopped off. This cannot be corrected. Go ahead and tilt the camera down, but there is a bit of a trick to it. So don’t forget to check out my page on Managing The Perspective. EXPOSURE SETSThe idea here is to isolate the different types of available light so that I can control the brightness and the color of each of them separately in the final rendering. Be sure to visit my page on Managing Mixed Lighting. Start with ALL of the lights on. This should include all of the lights in background areas such as hallways or rooms seen through open doorways. We don't want to look into a dark space. Kitchens have lots of lights. Lights under the cabinets, or the exhaust hood. Bedrooms; candles? All good. Start shooting exposure sets.
Your camera's meter might give you a perfect first exposure, and then you will only have to go darker from there. However, sometimes the first exposure is not bright enough. Make sure that you can at least barely see the detail in the darkest areas of the image, such as underneath the tables. There will almost always be highlights in this image that blow out. Shoot the darker images, adjusting the exposure compensation one stop between each exposure. It could be be six or seven images. Try to be sure that your last exposure that is so dark that nothing is blowing out. You should be able to see all the detail out the windows including the sky, and all the detail in the chandeliers or complex light fixtures. Shoot that image and then maybe shoot one that is yet another stop darker. Seriously. Even the view out the window can look a little under exposed. Some or most of this image may be completely black. (BTW, for those who may be asking, no, I do not use an HDR app.)
Turn 'em Off - The second exposure set should be with all of the lights off. Same exposure strategy. This assumes that there is some daylight, and that you're not shooting in a windowless bathroom or a big cardboard box. :-)
Can You Get Rid Of The Daylight? - In Chuck's magic world, we would be able to flip a switch and turn off the daylight and just photograph the interior lights. Yeah. Wouldn’t that be great? But let’s get real. Sometimes there is nothing you can do. so you may not even shoot this set. However, if there is any way to screen out even part of the daylight coming from outdoors, you should do it for a third set of exposures. Don't worry if you can't eliminate all of the daylight. Some is better than nothing. Also don't worry if your shades/drapes/blinds are actually in the shot. We still want to close them. This exposure set needs to be the last of the three. If you move something in the shot, it will never get back exactly where it was. The other two exposure sets must register perfectly so do them first before you start moving the shades/drapes/blinds. Direct Sunlight You've got south facing windows. I love working with a little direct light coming in on walls and floors, but I might hesitate to show it hitting the furniture (the viewer starts to worry about damage to the upholstery), or if it would be shining on a chair in such a way that you wouldn't want to be sitting in it. Go easy on the direct sunlight, especially if it is featured in multiple images. Too much might distract the viewer from the main center of interest, which is the interior design. But for the most part, there's no need to avoid shooting towards the windows. We like Windows. When shooting a space that features prominent windows, it's best if we can see some blue sky. Don't shoot on a cloudy day if you can avoid it. WHEN TO SHOOT
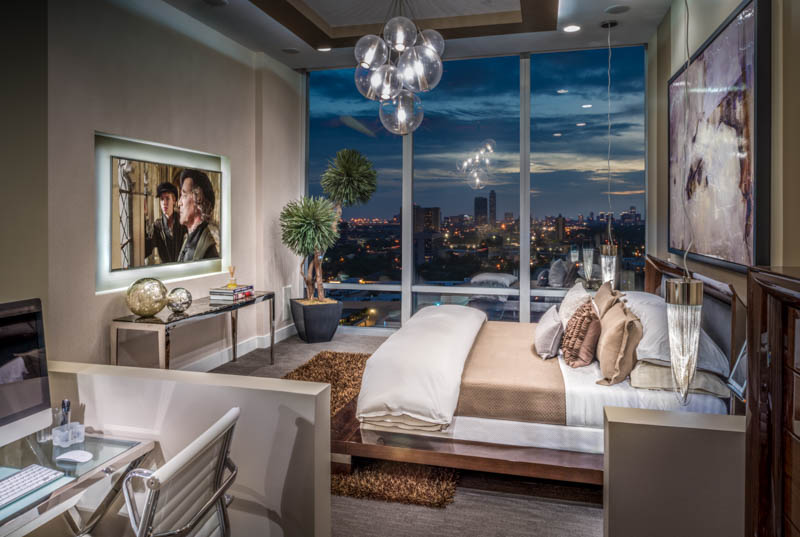
SHOOTING AT NIGHTWell, OK. There are times when may really want to completely eliminate the daylight. Even shoot at night. This happens often in the rooms where the lighting is a specific part of the interior design, and we don't want it to be overpowered or "filled in" by the window light. Kitchens are often prime examples. Even though windows are important, adding lots of dynamics to most interior photos, I often shoot kitchens at night, from angles that don't show any large windows. Some bedrooms seem to work better when they are shot at night. But even then, you don’t want the windows to render black.
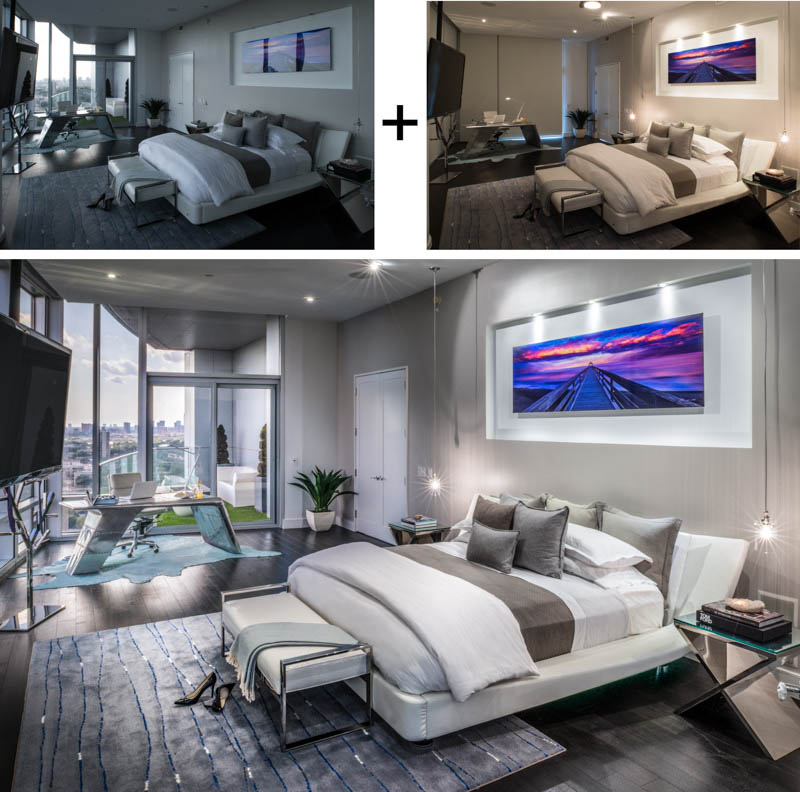
When I set up for this shot, I did a test with all the lights on, and the view out the window was completely black. So I turned the lights off, and I did a very long exposure of the window to get a little bit of blue and some of the neighborhood lights. That ended up in a composite image that included the interior lighting. This can also work in a kitchen where you can't avoid shooting towards some windows. Usually, you can only do this once in any given evening. Here is my sort of bottom line about the night sky. Whether I’m shooting, interiors, exteriors, or scenics, I never want to see a black sky. It just doesn’t look realistic. To me if you want it to look like night time it needs to be dark dark blue, but not black. THE DUSK/SUNSET SHOTMaybe you’re in a room that has a spectacular view. Or at least one where large windows make up a major part of the architecture. I have a technique for shooting this installation with the setting sun outside the window. Trying to accomplish this in a single exposure is near impossible. There is only a brief few moments where the brightness of the outdoors balances with the brightness of the indoors. And that moment is not going to be the best looking part of the sunset. So you have to shoot them separately. That gives me a whole lot of control in the editing process and I can make an image that is almost always eye-catching.
For this photo, after finalizing the set up with the designer, we turned off all the interior, lights, and I shot a series of images featuring just the setting sun out the window (kill any reflections). That whole process took about 40 minutes, but in the end I had 10 or 15 different properly exposed images of the view out the window. That allowed the designer and I to later choose the best looking sunset. After it was completely dark, we shot all the interior lighting, and once again, another composite image. I ended up choosing the one on the left. The designer liked the other one. This technique is not difficult, but you spend a lot of time just waiting for the sun to set. FILE DELIVERY
There are several good ways to transfer large files. Unfortunately, email is not one of them. I have worked with Google Drive, Zip Share, or just plain old FTP. I highly recommend Dropbox. Once you get it installed, it’s completely effortless for the user. You just throw the files in a folder on your computer, and they show up in a folder on my computer. I will be happy to help you get it set up. WANT TO KNOW MORE? LET'S TALK.Talk is free and I love chatting with designers and photographers. Operators are NOT standing by. It's just me. :-) |
About Me
How Does It Work?
Shoot with your iPhone?
INFO FOR THE SHOOTERManaging the Perspective
Managing Mixed Lighting
My Shooting Technique
|

 ISO - the higher you set the camera sensitivity, the lower the quality of the image. A high ISO setting will add noise to your image. I strongly recommend that you set the ISO on the lowest numbered setting that your camera offers. Some cameras have some special purpose settings, such as “Lo“ and "Hi" but those will not deliver the highest quality. Most cameras will offer 64, 100 or in some cases no lower than 200.


 I know that timing and access can be tricky, but if possible, shoot during the day. We want the light coming through the windows, direct or otherwise. After dark the windows look like big ugly black mirrors. Not good. Seriously, don’t shoot at night.


 Be sure to send me the files directly as they come out of the camera. Do not open them in any other application before you send them to me. I need the absolutely original RAW format file. If the suffix on the file name is “JPG” or “TIF“, that’s not a RAW file.